A character from a bare mesh
What you have: RobotExpressive.glb — a real, if genuinely unskinned,
character mesh: a torso, a head, four limbs, hands, feet. What you want:
a rigged, weight-painted, animated character, exported as one GLB you can
drop into a game template.
This is the case that leans hardest on the animation core T4/T5 built: auto-rig (screen 16), the weight brush and its gradient (screen 13), a posed clip with keys (screen 07), a morph with a real driver (screen 15), and the "as in game" preview (screen 19).
1. Import, genuinely unskinned
Open RobotExpressive.glb. The file itself carries two real glTF skins —
checked directly while writing this case, GltfLoader().load on the raw
asset reports two — but nothing in this build's import path reads a glTF
skin yet: ImportInto's own doc comment says plainly "skeletons are not
carried across", the same function session.import/an agent's own import
tool already calls. So the project this case starts from really has no
skeleton at all — not because anything strips one, but because nothing
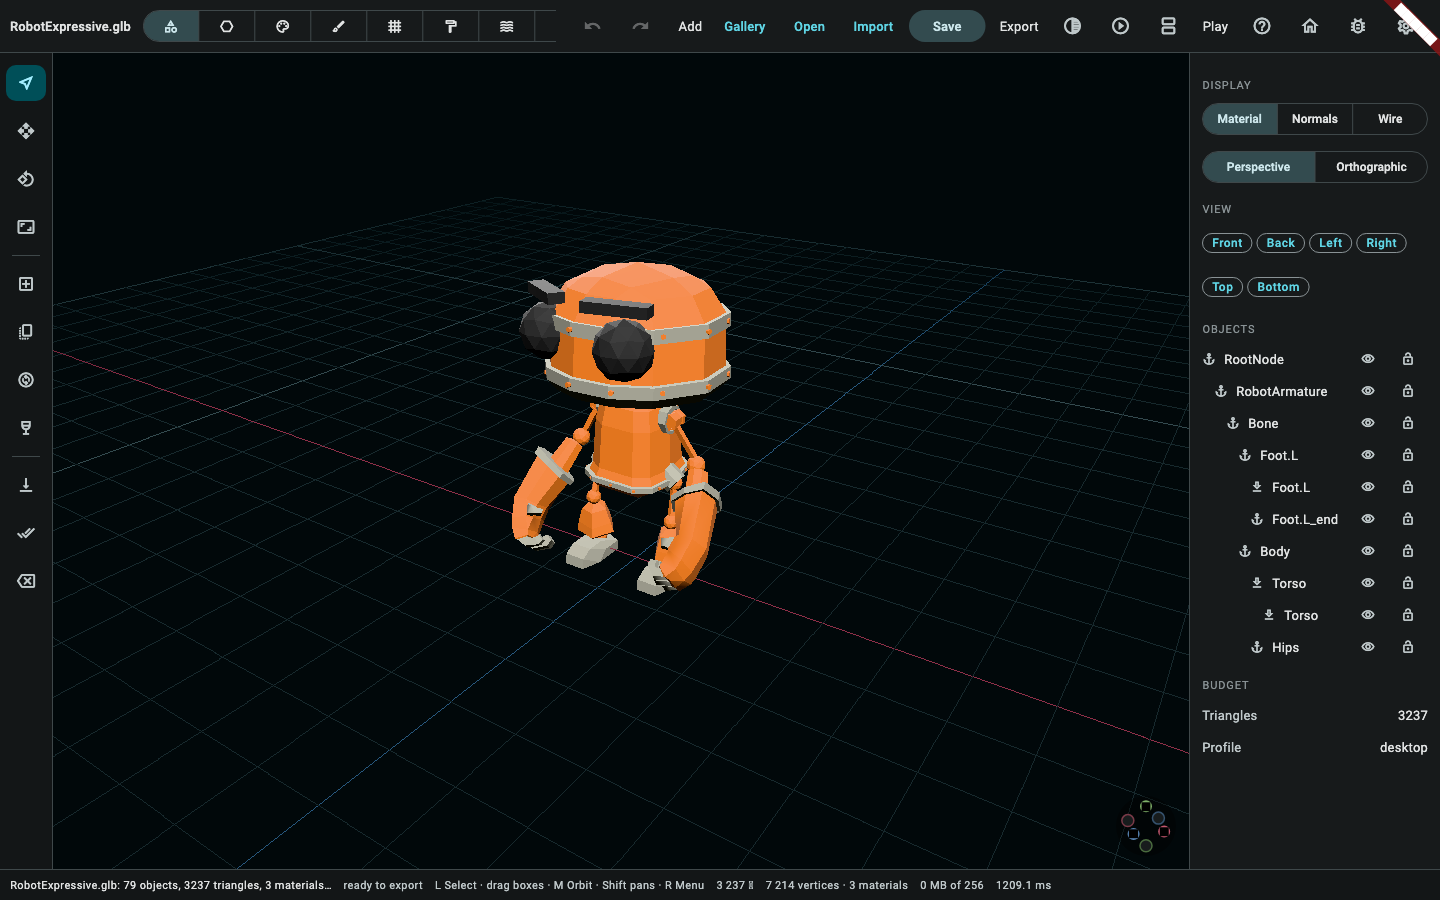
brings one in. 79 objects land: mesh shells (torso, head, arms, hands, legs,
feet) and bare bones alike, every one a plain object with no skin.
2. Auto-rig: markers, build, bind
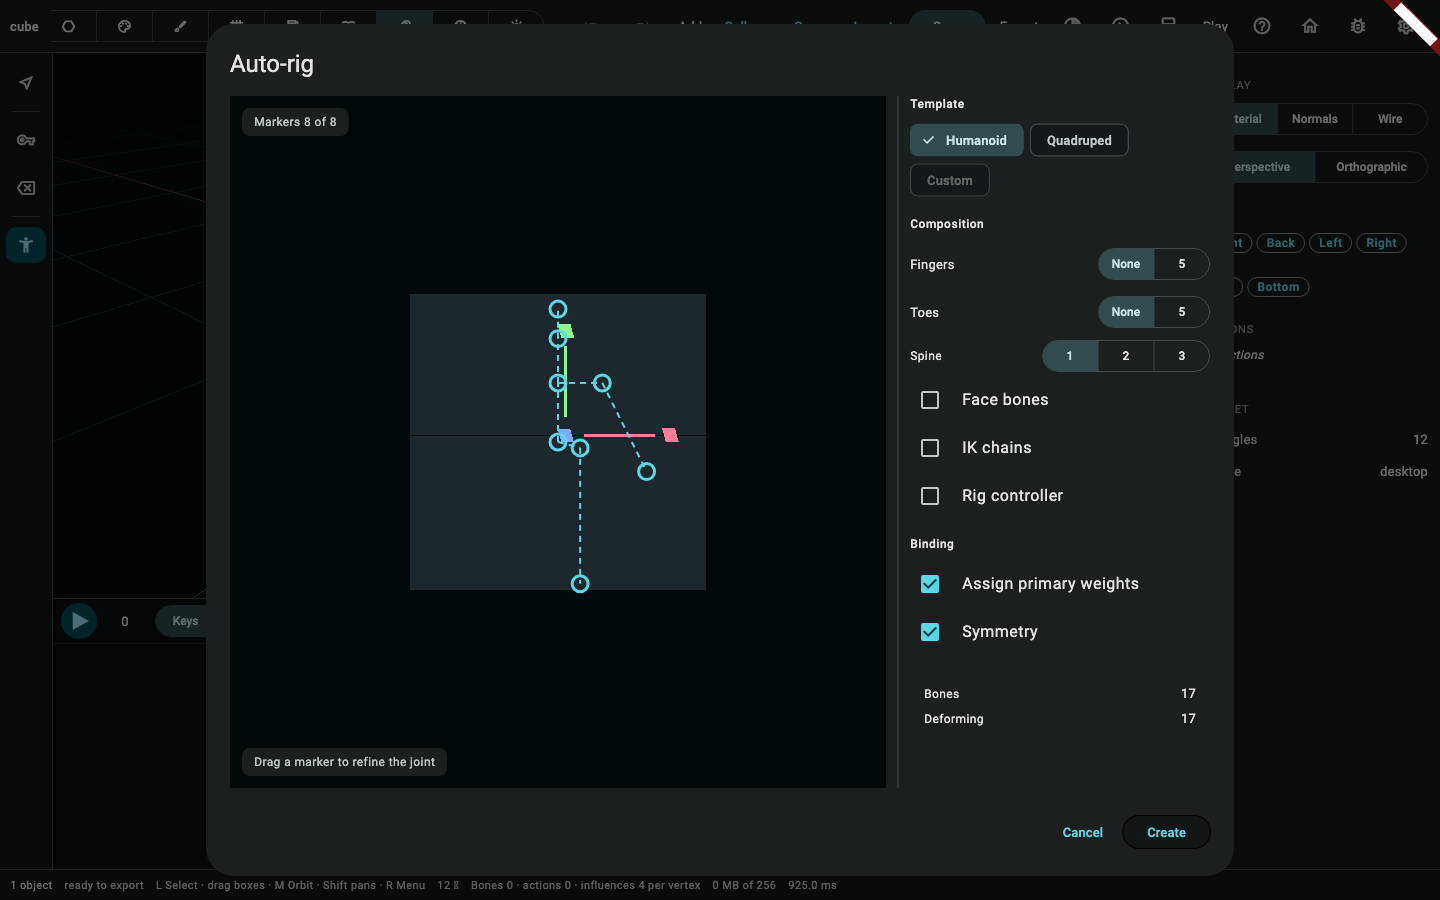
Open the auto-rig dialog (screen 16) and place the eight on-screen markers
over the robot's own silhouette — hips, chest, neck, head, one shoulder,
one wrist, one hip, one ankle; the dialog derives the rest (spine, elbow,
knee) as midpoints, the same shape buildSkeleton's own bone table already
derives a phalanx or an extra spine segment from. Create runs the whole
pipeline as one journal step:
buildSkeleton(humanoid, markers, options: RigBuildOptions())— a 17-joint base rig (hips/spine/chest/neck/head, shoulder/elbow/wrist and hip/knee/ankle mirrored left/right).bindWeightsJobRequestForover the body mesh's own bone segments, run as a background job — distance and visibility against the mesh's ownTriangleBvh, the same "close enough to be useful, not a physically simulated diffusion" passanim-22's own row promises.mirrorSkinWeights, so the side a person actually painted (or, here, the side the bind reached first) copies onto its mirror image by name.- One
SetRig— every new joint, the skeleton, the bind, undone together or not at all.
The body ends up bound to more than one joint (checked directly: this case's own test walks every live vertex and confirms more than one joint carries weight across the mesh, not a single-joint collapse), each vertex's own weights summing to exactly one.
3. Weight paint: a touch-up, and its gradient
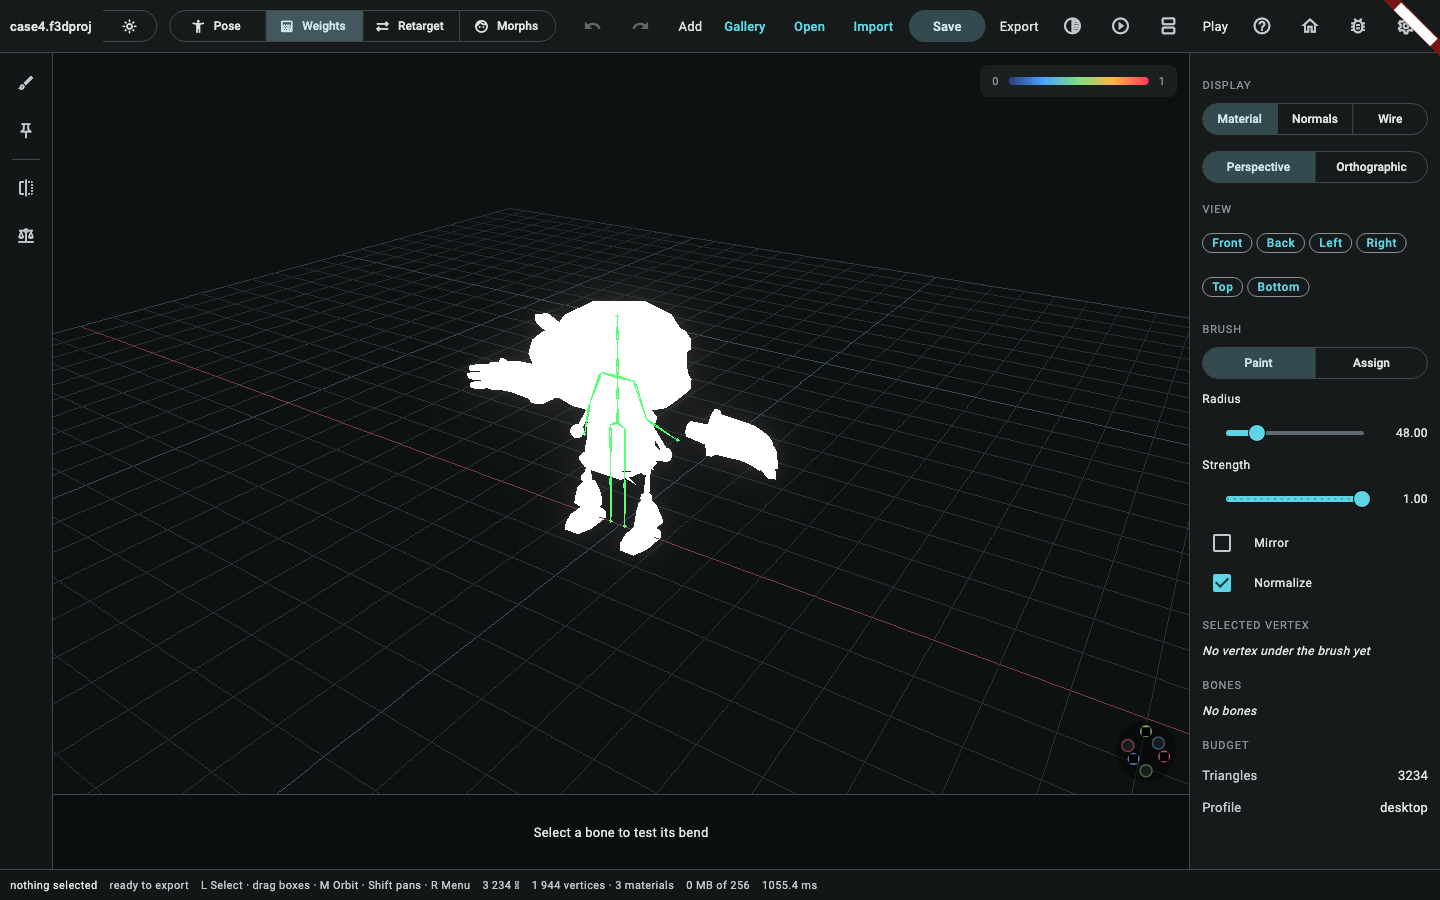
Switch to the animation mode's Weights sub-mode. The distance-and- visibility bind above is a starting point, not a finished paint job — the shoulder seam where the arm meets the torso is the usual rough spot. Two brush strokes retouch it: paint mode, the shoulder joint, a modest radius and strength, one drag of two or three samples each.
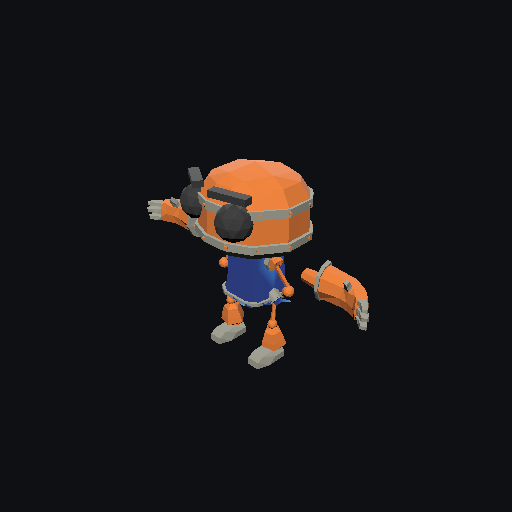
While painting, the mesh shows the weight gradient — five colour stops from cold blue (unweighted) through green, amber and hot red (fully weighted to the selected joint), the legend in the corner naming which is which.
The gradient itself has a headless equivalent now.
RenderShading(render_project.dart) gained a third member,weights, alongsidematerialandnormals:render/renderSheettake ajointargument and bake the identical five-stop gradient into the object bound to that joint's own skeleton — the picture below is a real one, not a placeholder (tut-11, fixed alongsidetut-07/tut-10).
4. A short clip: bend, pose, keys
The bottom slot under the viewport in the Weights sub-mode is a bend slider:
drag it and the elbow turns live, in the viewport, for judging a paint
against a real pose. This live bend is deliberately not undoable —
ui/bend_slider_bar.dart's own doc comment says outright that it turns the
joint's live scene node directly and "never touches ModelHistory" — so
there is nothing there for an agent, or a headless case, to call.
The document-level equivalent — what actually lands in the clip below — is
turning the joint's own persisted transform, the same way case 3 turns its
imported box: select the elbow, then RotateBy(axis: (0, 0, 1), radians: 60°, pivot: individual, space: local). Switch to the Pose sub-mode,
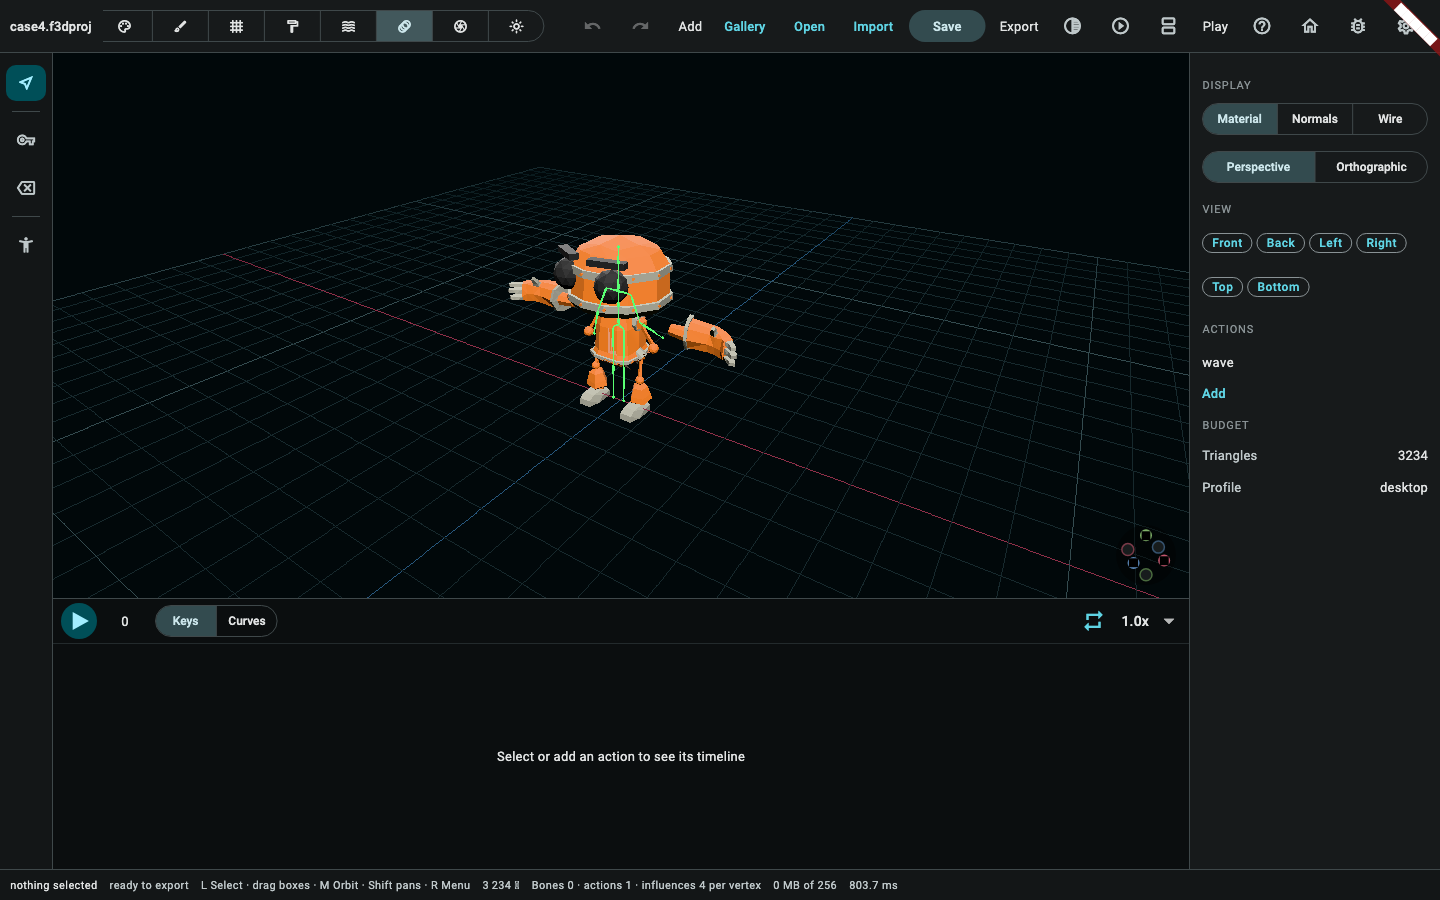
add a clip ("wave"), and key it:
PoseJoint(elbow, rotation, frame: 0)— the rest pose, keyed before bending.- Bend the elbow (the
RotateByabove). PoseJoint(elbow, rotation, frame: 12)— the bent pose.
The transport bar now shows one clip, one track, two keys — bending it by dragging the timeline scrubs between rest and bent.
An agent reaches the same document a person's live bend never touches, through a different door. Both a person's slider drag and this case's own
select+RotateByend at the identical persisted transform once a pose is actually keyed — the slider is a live preview before a key is set, the command is what a key actually captures either way. Worth a line in the gaps journal (tut-09), not a defect this case works around; see the note at the end of this page.
5. A morph, and a real driver
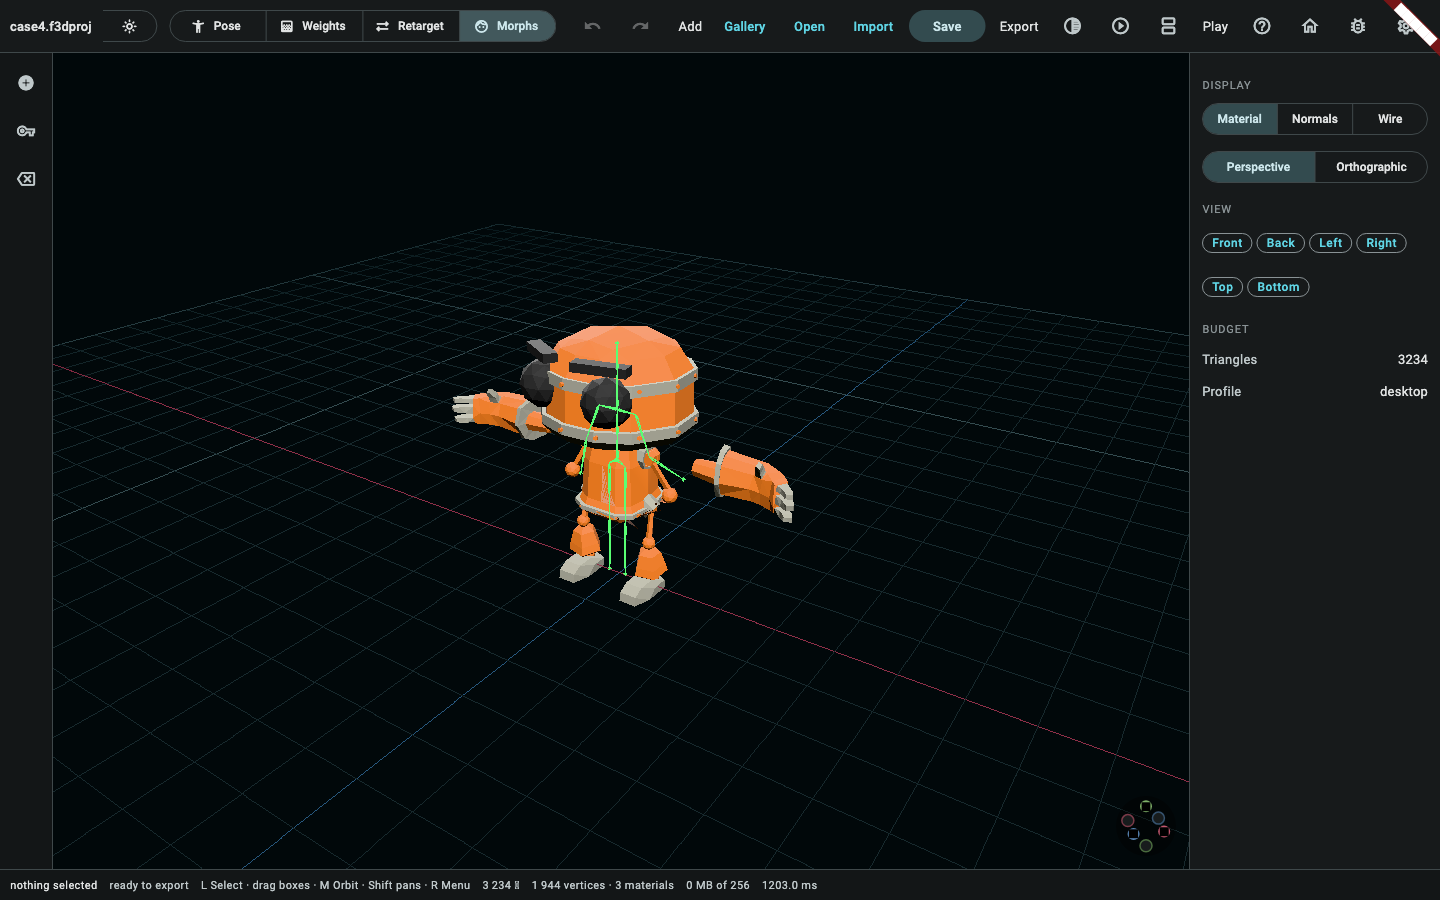
Switch to the Morphs sub-mode. Select the upper half of the chest shell and scale it out from its own centre — a "chest puff" — then capture it as a shape key with Add from mesh, and scale the same selection back down by the exact inverse so the resting mesh is untouched. The morphs panel now shows one row, "chestPuff", a slider and a key-point dot.
Add a driver: chestPuff, driven by the left elbow's own bend, 0° to
60° mapped onto the shape's own 0–1 — the same "a face that flinches
when an elbow locks" anim-20's own row describes, on a chest instead of a
face, since this mesh has no separate face geometry to sculpt a flinch
onto. Key the shape's own weight alongside the pose: 0 at frame 0 (rest),
1 at frame 12 (bent) — the same clip the elbow's own rotation already
lives on.
Live morph deformation is out of scope, by an earlier, already-recorded decision —
S6's own row says plainly "living morph deformation in the viewport is not built" (SceneSynchas no morph pipeline). The shape key and its driver are both real, persisted document state either way; only watching the chest actually puff in the viewport waits on that row.
6. Preview, as in game
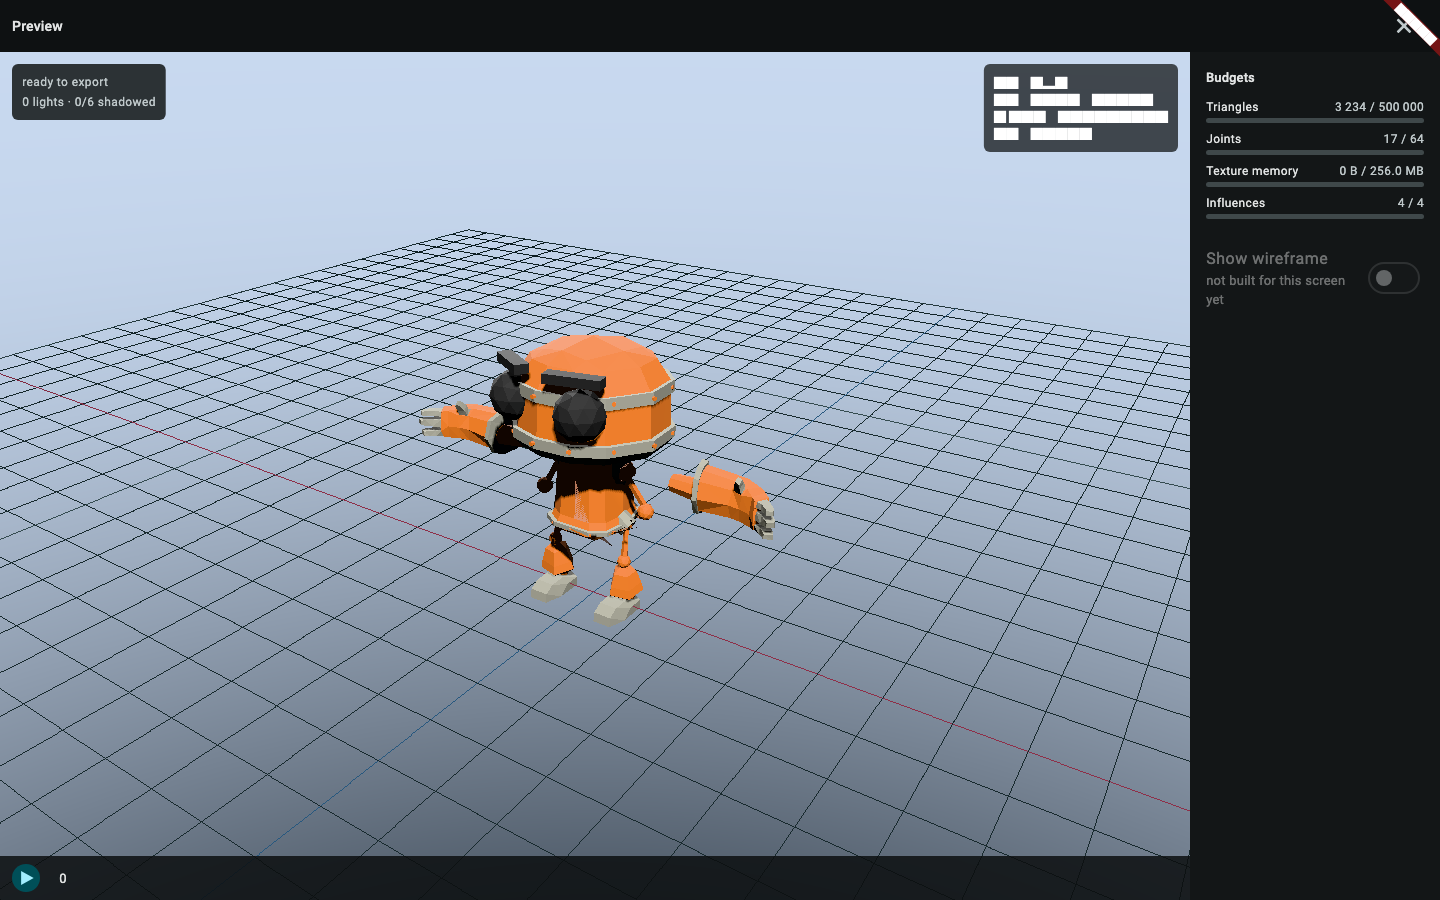
Preview (beside Export in the top bar) opens the full-screen game-preview route: the profile's own tonemap and shadow settings, a sky, an fps/draw-call/ triangle/bones overlay, and four budget bars (triangles, joints, texture bytes, influences) against the current profile.
7. Export, and into a game template
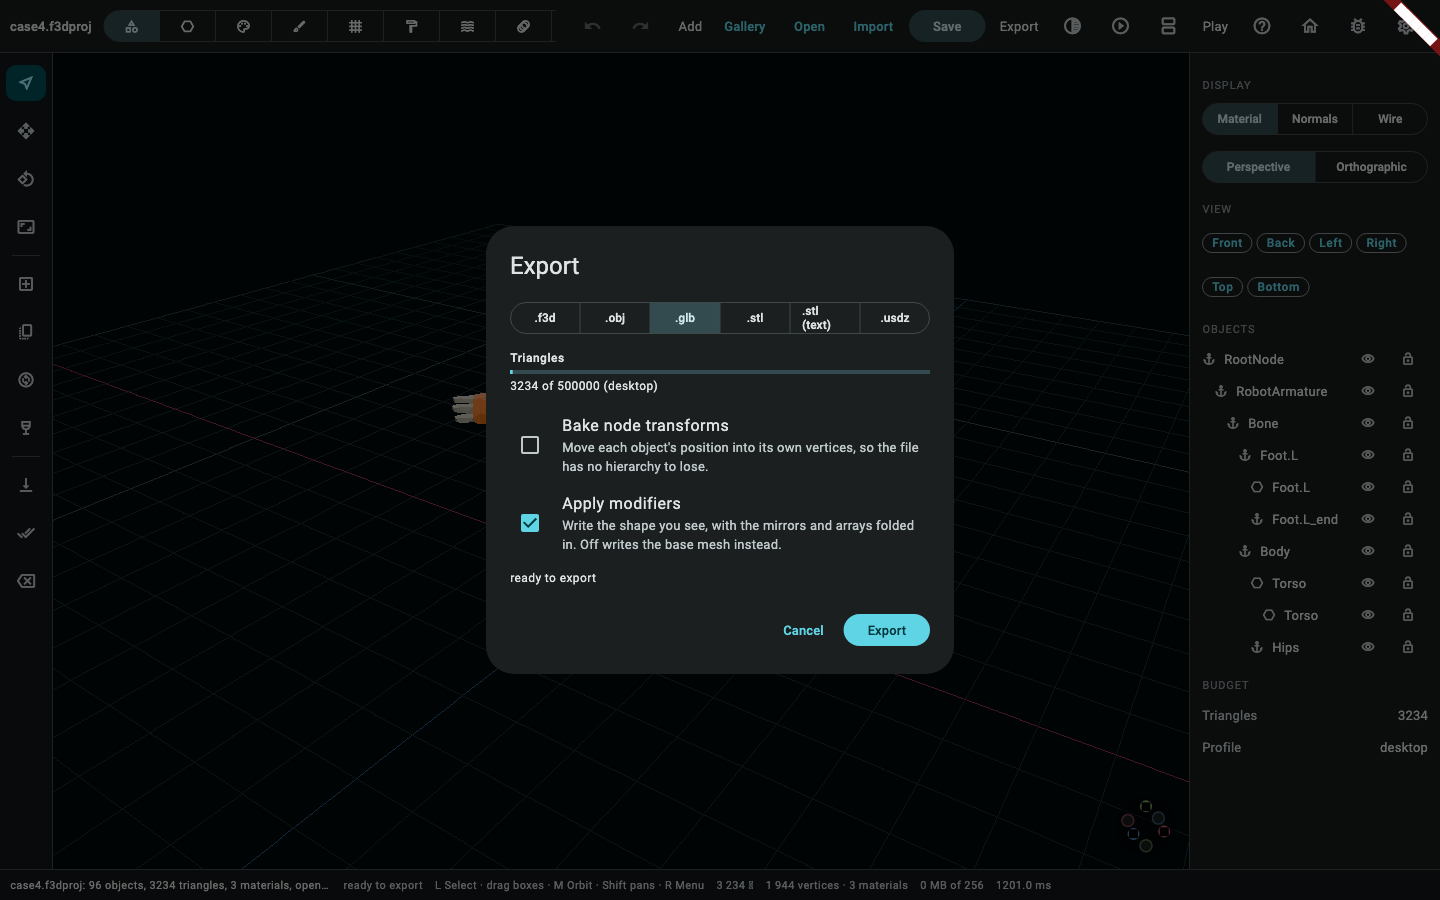
Export → GLB. Decoding the written file back: a real skin (the 17-joint skeleton, weights and all), a real animation clip with real keys. Upload it to the cabinet the way case 1 does, then open the game template project and point it at the exported file — the character walks in already rigged, already carrying its one clip.
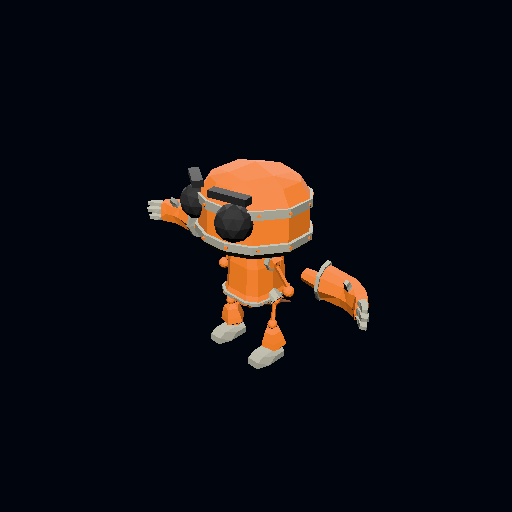
Below is this exact project, rendered headlessly through renderProject
(packages/flutter3d_model_mcp/lib/src/render_tool.dart's own underlying
function) — the real imported mesh, the real 17-joint rig, the real bound
weights, the real "chestPuff" shape key and its driver, the real "wave"
clip, all as they stand once every step above has run:
Notes on this page
Time to complete: not recorded yet. TODO: a person should walk this
case by hand on a real machine and fill in a line here — "n minutes,
date, machine" — the way rel-09's own cohort rows do. Nothing in this
session could actually run the desktop app, so no time is claimed.
Screenshots. Every picture of the editor on this page is real: the
imported robot before anything rigs it, the auto-rig dialog, the pose screen
with its timeline, the weights sub-mode with the bend bar, the morphs panel,
the game preview and the export screen. All but the first two are taken over
case 4's own saved document. They are taken headlessly rather than by hand —
apps/flutter3d_modeler/test/tutorial_case_screenshots_test.dart drives the
real editor under the software rasteriser and photographs the window — so
they are goldens: a run says whether a panel has moved since, and one
command regenerates every page's pictures at once.
(cd apps/flutter3d_modeler && flutter test \
            test/tutorial_screenshots_test.dart \
            test/tutorial_case_screenshots_test.dart --update-goldens)
          dart run tool/publish_modeler_screenshots.dart
The auto-rig dialog is photographed over the starting cube rather than over
case 4: that document is the state after the rig, and autoRig refuses —
correctly — to build a second skeleton over a rigged object. A bare mesh is
what the dialog is for, so a bare mesh is what it is photographed over.
The one real render, now showing the rig too. The picture above is a
genuine CPU render of this case's own final project — the real imported
mesh, the real 17-joint rig, the real bound weights, the real "chestPuff"
shape key and its driver, the real "wave" clip — through the same
renderProject the render/renderSheet MCP tools use, and now posed
through that rig and blended toward that shape key too: the bent elbow and
the puffed chest both show, read straight off the document's own current
joint transforms and shape weights rather than off any animation curve
(tut-10, fixed alongside tut-07/tut-11). What it does not show is a
narrower, separate, pre-existing bug this fix's own first real render
turned up: RobotExpressive.glb's own auto-rigged torso carries a real
scale-and-axis-swap transform from its own import, and buildSkeleton's
own bind-matrix convention disagrees with the live engine's GPU skinning
pipeline about which space that transform belongs to — worth its own row,
not folded into this one, and not visible here since this page's own render
uses the corrected, CPU-side math rather than the live pipeline. See
doc/modeler-tutorial-gaps.md for the full entry, alongside
tut-09 (bending a joint for an agent or a headless case is select +
RotateBy on the joint's own object, not the live-only bend slider).
Proving it. packages/flutter3d_model_mcp/test/fixtures/tutorial/ case4_scenario.dart builds exactly the project this page describes, against
a live ModelSession seeded with RobotExpressive.glb imported the way
session.import (or an agent over MCP) actually would — through the free
importInto function, which is also why this case's own skeleton starts
empty rather than something a test-only step had to strip. Its own
runCase4Scenario calls the real pipeline: buildSkeleton →
bindWeightsJobRequestFor (awaited directly, the "synchronous enough for a
headless case" shape a core-package test already uses, rather than through
ModelerCubit's own background-job wrapper) → mirrorSkinWeights → one
SetRig; two real PaintWeights strokes; a real vertex-selection sculpt,
AddShapeFromMesh and its exact inverse; PoseJoint/KeyShape building one
real clip; one real AddShapeDriver. tutorial_scenarios_test.dart's own
case-4 group checks five things: the scenario reaches the exact project
committed as case4.f3dproj and exports the exact case4.glb, byte for
byte, with compareModelDocuments confirming the decoded GLB matches too;
the rig is a real 17-joint skeleton with the body mesh actually bound to it
and weights that vary joint to joint, not a single-joint stand-in; the shape
key, its driver and the clip's own two tracks are exactly what this page
describes; the exported GLB carries a real skin and a real multi-key
animation, the same acceptance rig_pipeline_mcp_test.dart's own anim-30
scenario already checks for this file; and — the same fix cases 2 and 3's
own tut-05 closed — case4.jsonl, replayed through
CommandJournal.replay from right after the import, now rebuilds the
exact document this case's own fixture holds, past the
vertex-selection-dependent step (the chest sculpt) that used to be where
it got stuck: PaintWeights and SetRig both already replayed clean
cold, and the mesh-vertex selection the sculpt needs is a real, replayable
SelectElements line now too. Driving it live is still what
dart test test/tutorial_scenarios_test.dart actually does; the cold
replay from right after the import is now one more thing it checks.